Summer is here: Traditional Caprese Salad


Finished_Salad3

I was in Grand Central Station last week for a meeting and decided to stop in to pick up some produce at their fashionable market on my way back up to CT.  For anyone that hasn’t been to the Grand Central Market it is a little paradise of food – farm stand produce, gourmet cheeses, artisan breads, jams, jellies, pastries, chocolates and truffles, cured/aged meats, fresh fish and poultry, and the list goes on.  As you can imagine, this little haven of food comes at a cost and is the biggest tourist trap going.  I knew I’d probably pay top-dollar, but I promised to bring a side to the dinner-party I was headed to that evening and knew I wouldn’t have time to hit up the grocery store beforehand.  Poor planning on my part.

1slice of tomato

As I scanned the abundant selection, I stopped short in my tracks at the sight of a table full of gorgeous vine-ripened tomatoes in every shape, size, and color known to the imagination.

Tomatoes

Right now is probably a good time to pause in the story and tell you about how much I love summer tomatoes.  There are obvious reasons – I am half Italian, I grew up every summer picking them from my grandparents garden, I even have a best friend from college that loves tomatoes just as much, if not more, than I do – but aside from posterity and fond memories, there is an X factor there that I can’t quite put my finger on that makes tomatoes stand out.  Among the many splendid summer fruits and vegetables, garden tomatoes are by far those that I look forward to the most.  They’ve always just made me happy.

Tomato Slices

So as I was saying, I approached the tomato table and carefully selected 3 perfect tomatoes.  I was in a rush, half paying attention, and texting with my hubbie when I was rung up.  I’m not going to tell you how much my total came to (because it’s embarrassing), but let’s just say the cost was more than my round-trip train ticket to and from CT.

Mozz

As mentioned, I was in a rush and really had my heart set on the tomatoes at that point so reluctantly forked over my card and ran out of the market to catch my train.  I vowed on the way home to never, ever again pay so much for produce, but I have to admit (and I think everyone at the dinner-party can tell you) that they were pretty outstanding.

Finished Salad


Caprese Salad Recipe Card

Roasted Baby Carrots and Shallots

Finished Recipe2

Easter is obviously over, but carrots are always in style.  The carrot has become a symbol of Spring due to its affiliation with Easter, but the best time to harvest carrots is actually in the Fall.  Despite the fact that it’s not currently the ideal season, I’ve been making a mean baby carrots and shallot side lately that is so delicious and versatile, I must share.  I don’t mean the kind of baby carrots that come shaped by a machine and packaged in a plastic bag (although those do make great snacks), but the kind that look like they’ve been yanked right out of the ground.

Full Carrots

Carrots remind me of something playful, like a bouquet of daisies or tulips.

Pot of carrots

This side is beyond simple to prepare, yet looks elegant.  For some reason there is something about baby carrots (and shallots) for that matter that make people think a lot of time and effort went into preparing, but in reality they are pretty low maintenance. One tip to keep in mind, the stems are a bit longer above (to make my photos look pretty!), but the reality I found was that the stems come out tough and chewy when roasted.  I’d recommend trimming the green stem down to no longer than an inch (as seen in the finished product).

IMG_1823

I also like leaving the tail end of the shallot in place, which holds the bulb together.

IMG_1833 - Version 2

Toss everything cleaned up with a vinaigrette and into the roasting dish they go to cook for about an hour or until you can pierce easily with a fork.

Tossed

I adore this dish with a pork tenderloin or chicken, but steak and a number of other meats and poultry would work as well.  Enjoy!

Finished Recipe

Slide1


Hearty Zucchini, Chickpea and Kale Soup

Image

We have been lucky enough to have had nearly 3 straight weeks of visitors in Jackson Hole – a combination of beloved family and friends (see pictures below) so even though I have done some entertaining and cooking, there hasn’t been anytime for blogging.  I know – poor me, right?  I’m not complaining!!  But first, I thought I’d write about a soup I’ve been making that is perfect in what continues to be very chilly weather out here (9 degrees when I woke up yesterday – 1st day of Spring you lie!).  Lately I have been on a chickpea – or garbanzo bean as they are called – kick (you might see some falafel or chunky hummus spread popping up here in the near future) and can’t seem to get enough of these pudgy little beans.

chickpeasThis recipe was derived straight from Mom per usual.  She was home one night and sent me a photo of the soup she had made for dinner.  I thought it looked so delicious and easy that I made it that next day and have been hooked since.  It’s perfect for making at night and then heating up again for lunches and like all soups gets better with time.  It is healthy and chocked with protein, but doesn’t taste like it should be so healthy – in other words, it’s enjoyable to eat and you can dig in guilt free.

vegetable medleyVegetable soup – in general – can get really watered down from all of the natural moisture extracted from cooking down a pile of veggies so you want to make sure you buy regular or low sodium chicken or vegetable broth.  Sodium-free (while I know it’s more appealing for a variety of health reasons) will make the soup taste far too watered down.

zucchini peeled zucchini choppedSprinkle with a spoonful of nutty grated parmesan cheese and enjoy!

soup with cheese

Soup Receipt cardAnd now for a little timeline of our past few weeks.  We kicked off the end of February/beginning of March with some of my very dear and old friends from college. The first night got a little rowdy after we received our shot-ski wedding gift from the Male’s :

shotskiWe took a scenic sleigh-ride through the National Elk Refuge with a whipper-snapper tour guide in some cool chaps that filled us in on more information about the elk than I ever dreamed I’d know about in a lifetime:

elk2 Geish&I2 Guide2The next set of visitors included Chris’s parents and siblings who are all really good skiers and luckily we got some fresh powder just in time for their visit:

Chris & his sibs“Just Horsing Around”

Palm fam - sleighrideAfter they left, Chris’s best friend from college arrived and Chris’s youngest brother Sam stayed for another week.  We did a snow shoe hike one day in the park:

Chris,Sam&IAnd the next day my family arrived.  Their first night here we went out to eat and were seated next to a table that included a very A-list celeb that was shoulder to shoulder with my brother who got to briefly chat with her baby son at one point in the night.  Can you guess who it is?  That’s right – Sandra Bullock.  Kind of a big deal.

Jay:PatThe fam was here for a full week – there was lots of skiing, meals at the condo, and laughs.  My Aunt Leslie went down her first black diamond at Jackson Hole – no small feat!

AL Con&FelMy Dad stayed a couple of extra days past everyone and proved to be just as classically lion-hearted as always skiing full 9am-4pm days, riding the tram regularly, and hiking the Headwall – go Jack!

Dad&IThanks to everyone for making the long trip out here to see us – we loved every minute of it!

Sausage & Peppers

Sandwich4This no-fuss meal is not fancy, but gosh is it good.  When I find myself wanting something filling and hearty I turn to this recipe.  For me, sausage and peppers is home.  My grandparents, uncle, mother, and even my cousins and siblings all know how to make it well.    It is a meal that might be one of the most near and dear to my heart.

SausageFor the men in your life, as long as they aren’t vegetarians, you can count on this being a winner.  It shows up in my household often – back by popular demand 🙂  I’ve posted it here on a lightly toasted bun, but I often just eat mine in a bowl with a piece of bread to mop up my plate.  It’s also really yummy over some penne.

PeppersSausage and peppers is also just as satisfying in the winter as it is in the summertime.  Paired with some potato salad and some tossed summer greens, cucumbers, and tomatoes, it is just as enjoyable as picnic food.  Whenever you choose to eat it please shoot me a note, I’d love to hear about your experience!Sandwich1

Sausage & Peppers_recipe card

Spicy Chicken Quesadillas

Image

My husband Chris has often told me that I’m bad at cooking unhealthy food.  If something is too creamy or fried I tend to shy away from making it the way it is “supposed to be” and opt to bake when I should fry and use olive oil and lemon juice to flavor rather than butter.  This is not to say that I’m opposed to fried or rich food.  In fact, I really just don’t believe anyone that says they simply don’t like something like mac & cheese or a big plate of nachos or fried chicken cutlets because let’s be honest, that stuff is GOOD. Quesadilla_final

Point being that I do love fried, fatty and rich, but I refrain (with all of my might) to balance it out with lighter cuisine.  This is why this post is painful for me to write because this quesadilla recipe was dreamed up by Chris – who tried to make it for me for dinner one night – and I refused to indulge.  I stared longingly at his meal while I myself ate a heap of celery, zucchini, carrots and stewed tomatoes (a vegetable soup recipe that I had insisted on making instead for myself that evening) and finally caved into having one bite – which turned into 5 – it was that good. chickenframed

I can admit when I’m wrong and although this recipe calls for a lot of cheese, these quesadillas aren’t as bad for you as I was fussing about that evening, and I haven’t even fiddled with the recipe!  I admit, that I did help with the rub for the chicken and the guacamole, but aside from that these were pretty much made by Chris – I take my chef’s hat off to him.Quesadilla_steps

They are delicious for an easy meal at home or sliced into thin wedges can serve as the perfect appetizer – maybe even for the big game that is just days away.  There is a fair amount of heat in these, so please cut your spice (mainly ground cayenne pepper and jalapenos) in half or completely if you are averse.  I hope you enjoy every bite and please don’t make the same mistake that I did and try to eat vegetable soup next to them, it just won’t work out unless you are Jillian Michaels or something.

Image

Effortless Chicken Soup with Couscous

chickensoupbowl

The time has come where I cannot put off updating this blog any longer.  I could give a nice laundry list of excuses, but to sum it up, Chris and I decided to add to our modest, little family last May with a puppy.  Izzy has been the biggest joy, but it took awhile to adjust to life with a dog, especially a young one (see photo below).  The time commitment was much more than I had anticipated and so you see, outside actives like this blog suffered.  I also switched jobs to a much more aggressive and time consuming role which didn’t help matters much.  But enough with the defensive justifications, and back to the goods, the FOOD.  I missed writing this blog and I hope to keep up with regular posts going forward – at least in the imminent future!

chickensoupveggies

So, for my big “comeback” (I know you were all waiting with bated breath!) I contemplated a variety of splashy and complex recipes, but with Nemo hitting New York this past weekend and the piercing cold weather, I could only concentrate on soup.  And what is more soothing or fulfilling during these icy months than a bowl of warm chicken soup?  I stole this recipe from my Mom (naturally) and it is honest to goodness FOOL-PROOF.  I’m telling you a child could not mess this up – it is that simple.

chickensouponion

I like to make a big pot and eat it at lunch (this will last you all week), but it could also serve as a starter to a meal or accompanied by some crusty bread would make a fine, hearty dinner.  Did I also mention that it’s healthy?

chickensoupcarrots

And, if you are feeling congested and achy in the cold weather, as many of us are, this soup is heaven.  Normally I wouldn’t use food as an archetype for something miserable like the flu, but chicken soup does remind me of the perfect cure to the sniffles or a tender throat and I owe this soup a compliment for making me feel better.

chickensoupinpot

Chicken soup is what I looked forward to most from my Mom when I didn’t feel up to par and was forced to stay home from school.  “Forced” being the operative word. 🙂

chickensoupcouscous

I hope you enjoy or serve it up to someone you care about that might be feeling a little under the weather this winter!

chickensoupbowl2

As promised, below the recipe is a peak at the precious little pooch who kept me away from blogging all of these months, but was worth every iota of my free time.  I’m sure you’ll be seeing a lot of her in upcoming posts!

Chicken soup recipe card2

izzy

Eggplant Stackers

When I think of a dish that was a culinary turning point for me, this recipe might be it.   Like many of my dishes, this recipe was half inspired from a restaurant and half from my Mom’s kitchen, but original enough where a lightbulb went off and I started to think about food outside of the box.  If you are like me, you are probably on the tireless path to recreating dishes that are not only nutricious and light, but TASTE GOOD.  In other words – searching for the loop-hole to a low calorie, low-fat meal that you can also look forward to eating.  While I love eggplant parm and lasagna, I often find the eggplant to be unappetizingly chewy, laden with heavy bread-crumbs and garnished with unwanted gobs of cheese.  I wanted to create something that wasn’t so heavy and overwhelming as I found many eggplant dishes to be.

Eggplant can be a tempermental little vegetable.  When cooked correctly it will make your taste-buds do cartwheels.  When prepared poorly it is similar to munching on the end of my pencil eraser – bitter, soggy, chewy.  Technically you are supposed to salt the eggplant to draw out some of the moisture.  I don’t include that step in this recipe, but I promise it will make any finished-product eggplant delciously nutty and tender.

Instead I brush the eggplant generously with olive oil on both sides and sprinkle salt and pepper over ultra-thin slices.  Peeling at least half of the skin away also gives the finished eggplant thins a crunchy finish.


After baking comes the fun part: stacking.  I set up my toppings much like an ice-cream sundae line.


You can be as creative as you’d like with your stacking ingredients.  I’ve found a layer of sauce, a small piece of paper-thin prosciutto and sprinkle of shredded mozzerella really does the trick.


Repeat and top with one last slice of eggplant and dusting of grated parmesean cheese and you have yourself a stacker.


Easter Weekend ~ Lesson on Lamb

This past weekend was golden, sparkling, and crisp.  The temperature is hanging onto the last whispers of winter and was sweetly chilly with bluebird skies and strong sunlight.  Chris and I headed up to Connecticut on Saturday to celebrate Easter first with my family, then his on Sunday.  We clinked glasses with family and friends…

and enjoyed the fresh blossoms after a long winter’s nap…

The men hovered around the television screen during the late afternoon rumbling and grumbling about the golf game and most certainly wishing they were down in Augusta, Georgia with Fred Couples and Phil Mickelson.

My cousin Katie dressed her sweet girls in the most gorgeous Easter dresses ever.

The dogs were in great spirits, tails wagging, and ready to be back outside…

We feasted on all sorts of traditional Easter brunch treats over the weekend.  It would come as no surprise that we had lamb both at my house and at my boyfriend’s.  My Mom loves lamb, but doesn’t make it often due to the fact that none of her children care for it.  I’ve recently bucked the trend a bit by gradually introducing lamb to my palate.  Little by little, my taste buds have evolved and I’m starting to enjoy this musky animal.  My Mom baked her lamb and Chris’s Dad grilled theirs on an outdoor charcoal grill.  The thing I decided was that I definitively liked the lamb at Chris’s house better, not because my Mom’s wasn’t delicious, but I think that my taste buds are not quite developed enough for oven baked lamb.  It’s not to say that one day I will like lamb prepared in many different ways and appreciate its gamy flavor, but for now I like it charred and smoky on an outdoor grill.  The photo below is my Mom’s oven baked lamb (recipe below) and unfortunately I did not capture a photo of the grilled lamb, but it was interesting to compare the two.

Holidays always make me feel so blessed to have such abundance.  Happy Easter and congrats to Bubba Watson!

Classic Greek Salad

Sometimes in life you need something light for dinner and nothing screams fresh and light like a simple Classic Greek Salad.  My boyfriend has requested this dish a couple of times since I originally made it (most often after a gratuitously indulgent weekend) to sort of cleanse the palate and recharge the batteries.  You won’t need many ingredients for this recipe.  Just enough crunch and the right amount of color make any Greek Salad a classic.   

Traditonally, a Greek Salad does not have lettuce, but I like to add a head of fresh buttery Boston lettuce.  Toss in some diced onion and tomato, chunky bite-sized slices of baby cucumbers, pitted chopped Kalamata olives and a dusting of fluffy feta cheese.  If you are feeling creative and want more of a zing, a handful of pickled peperoncini peppers (say that 3 times fast) add texture and a tart, refreshing edge.  Drizzle with a simple lemony Greek dressing and toss well.  Oh!  And because my boyfriend CANNOT stand to go one meal without an inclusion of some sort of meat product, I roll several dry-peppered salami slices to garnish the sides of the dish.  I have to admit I like them too….Enjoy 😉 

~ RECIPE ~

Classic Greek Salad (Serves 2)

1 Head of Boston lettuce

1 Tomato (diced)

4 baby cucumbers (semi-peeled and sliced)

1/2 Red Onion (diced)

Kalamata Olives (about 1/4 cup, pitted and thinly sliced)

1/4 Feta Cheese

Picked Peperoncini Peppers (5 chopped up; 1 for garnish)

Sliced Dry Italian Salami (4 or 5 slices rolled)

Greek Salad Dressing

1/4 cup freshly squeezed lemon juice

1/4 c. white vinegar

1 tsp kosher salt

1/4 tsp. freshly ground black pepper

1 tsp garlic powder

1 c. olive oil  

1/4 tsp. dry oregano

Dice and slice veggies and toss well in a large mixing bowl.  Make sure you squeeze the juices out of the peperoncini peppers and chop up well as they will be filled with water.  Prepare your dressing by emptying the Greek salad ingredients into a dressing bottle and shake well.  Drizzle lightly over the salad (you don’t want to over-dress the salad and make it soggy).  Scoop hearty helpings into each serving plate and finish with rolled salami slices and a bright green peperoncini pepper. 

Truffled Mushroom Pizza with Taleggio Cheese

I had made pizza dough (with my Mom) in years past but decided that any cook from Italian descent MUST know how to make a proper pizza dough.  Since I have been heavily relying on frozen pizza dough in the last couple of years, I figured it was time to learn (and eventually) perfect this technique. 

I turned to Martha Stewart’s recipe book ‘The Original Classics’ for a standard, run-of-the-mill pizza dough recipe.  WRONG choice and should have just called up my Mom (as I often do for most recipes/cooking tips), as Martha (or her editors of this lumpy, commercial cookbook) forgot to leave out the MOST important step of the process, the 8-10 minute kneading process!  SIGH.  So after literally 3 failed attempts over 2 evenings, I figured it was time to consult my Mom and some fancy You Tube videos.  I noticed that after you “mix” the ingredients together that EVERYONE on earth kneaded their dough for at least 5-8 minutes.  No where in Martha’s recipe does she instruct to knead and perhaps this should be a given, but if you’ve only made pizza dough from scratch a handful of times in your life, how could you know?  The recipe basically instructs you to mix the ingredients together and then let the dough sit and rise – which I did – and was left with a sticky, chunky uneven mess each time.  It was a catastrophe and very good lesson.  Sorry to slander you Martha as I am a big fan (and not ashamed to admit it), but a simple editing error like this in a cookbook can really set a girl back!  I won’t show you my failed attempts, let’s just say I finally got the hang of it after multiple tries. 

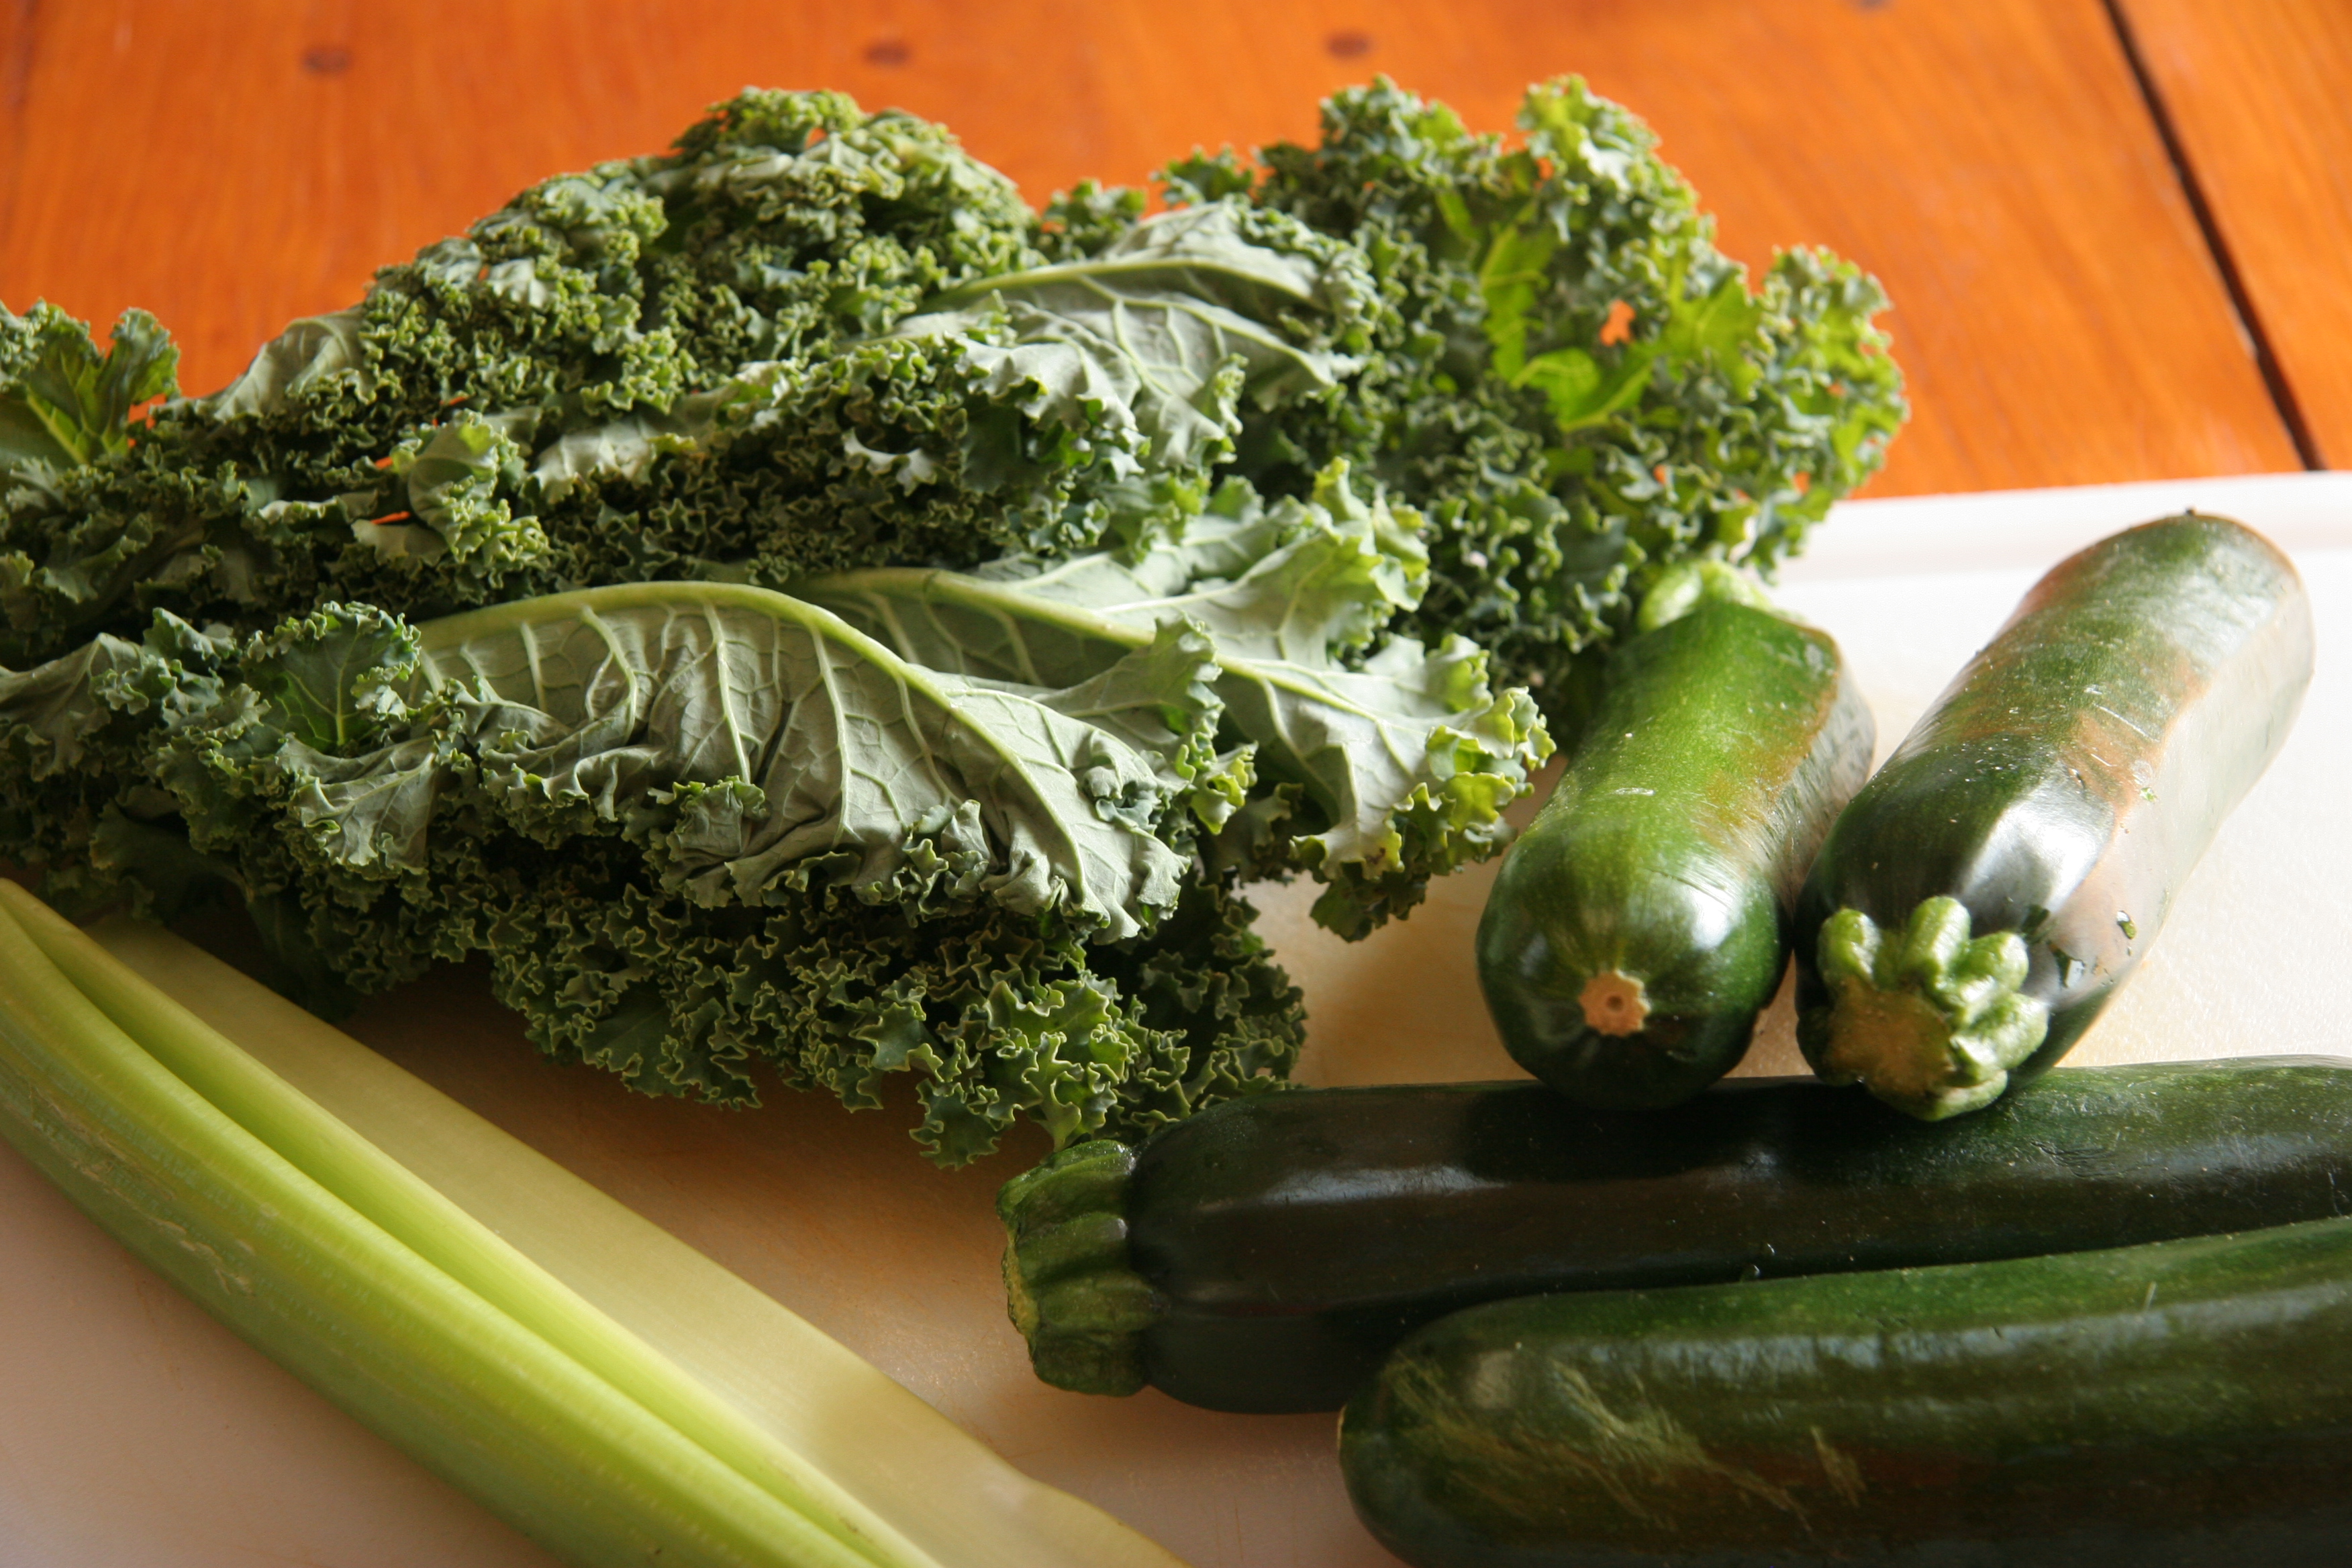
I recently purchased a fancy-pants cuisinart food processor that I adore so I try to use it as much as humanly possible.  It shreds and slices up vegetables beautifully.  Paper thin and gorgeous…

My affection for taleggio cheese began in a small wine bar in Hell’s Kitchen that I adore called Casellula.  I lived in the neighborhood for a short year and this wine and cheese bar was one of my favorite go-to spots in area.  They have a plentiful selection of refined cheeses, meats and small plates – just my kind of place.  I was first introduced to taleggio there and was smitten from the start.  Taleggio is miraculous on pizza and while the texture is sticky and soft (making it difficult to cut) when cold, it melts perfectly.  The cheese tastes a bit like mushrooms itself so makes the perfect complement to any mushroom za.  It is mild, earthy, nutty and slightly fruity.  Yum…
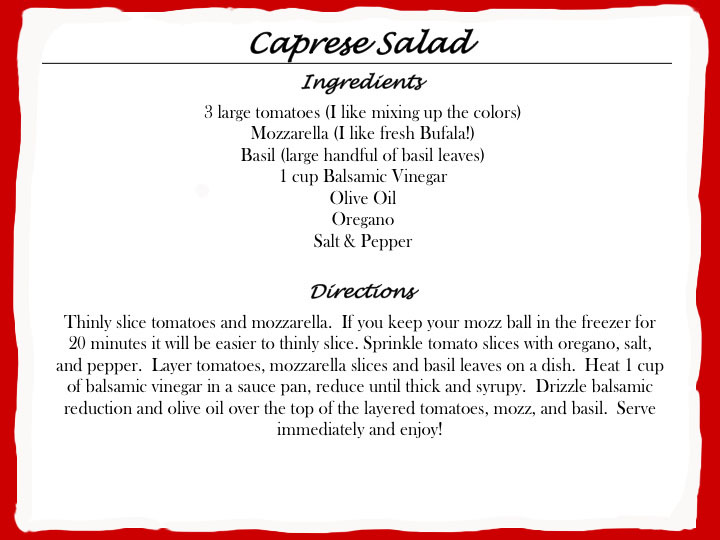
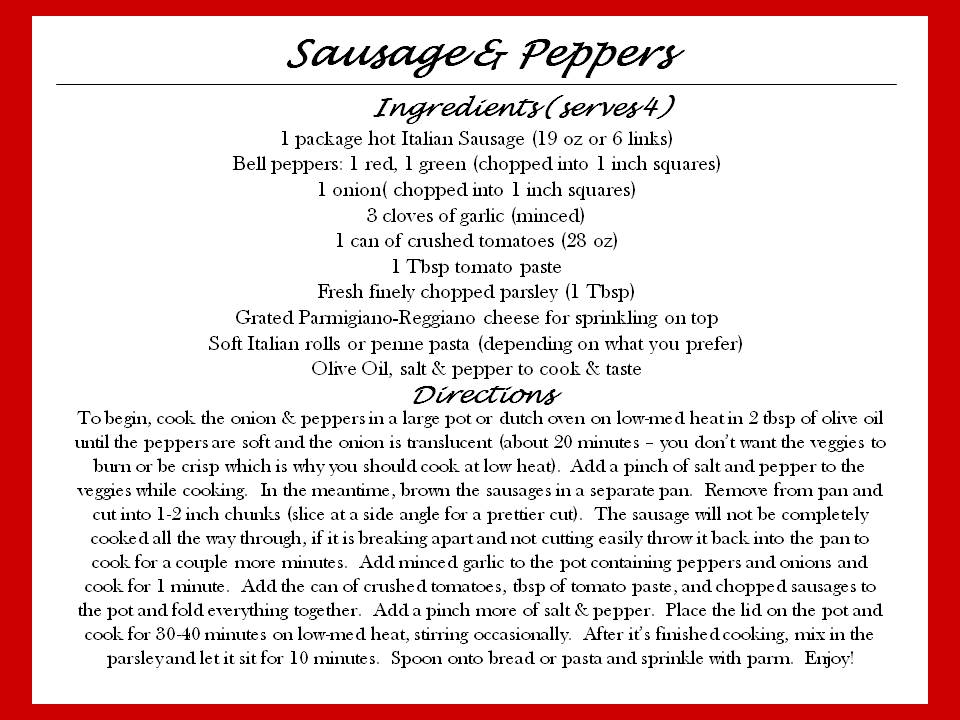
~Recipe ~

1 cup warm water (110 Degrees F)

1/4 Tsp Sugar

1 packet of dry, active yeast (or 2 teaspoons)

2 3/4 cups all-purpose flour

1 Tsp salt

1/2 tablespoons olive oil, + more for the bowl

‘Topping:

4-5 ounces of Taleggio Cheese

1 pint of white mushrooms

Parmesean Cheese to sprinkle

Pinch of salt and Pepper

Olive Oil

White Truffle Oil

Begin by mixing the yeast, sugar and cup of water (lightly stirring with a fork until dissolved) and let sit for about 10 minutes (if the yeast does not become bubbly and foamy discard as your yeast is probably outdated and inactive).  While yeast festers, mix the flour and salt together in a large bowl.  Add dissolved yeast and olive oil to the flour mixture and mix with a wooden spoon until lightly packed together.  Empty the contents (Even if some dough is still loose) onto a counter space for – that’s right – KNEADING.  Work the dough for about 8-10 minutes and it should form a smooth ball (for kneading techniques I would consult You Tube or watch someone do it correctly if you have the privilege).  After the ball has been smoothed, add just enough olive oil to cover a large round bowl.  Place the dough into the bowl (make sure you brush the top of the dough ball with olive oil as well so it does not get crusty on the top) and cover with saran wrap.  If all goes well, the dough should rise nicely in about 60-90 minutes or until the dough is about double the original size…

Next cut the dough in half (or leave as is if you want a large pizza), lightly flour your rolling surface, and roll into smaller balls for the second rising period (about 10 kneads into a ball, you don’t need to knead for a prolonged period this time).  Place dough balls onto a cutting board and cover with a clean towel or plastic wrap.  Let sit for another 60-90 minutes or until the dough rises to about 1 and a half times the size.

During the rising period(s), you can prepare the toppings.  In addition, if you have a pizza stone you might want to place it into the oven at this point and turn the oven on to 500 degrees F.  If you are using a baking sheet this step is not necessary, although you should preheat the oven at least 30 minutes before your dough is done rising. 

Back to the toppings…removing the rind, slice the cheese as thinly as possible and set aside.  Place mushrooms in food prosessor and transfer contents to a large mixing bowl.  I  like to toss the mushrooms lightly with a little olive oil, salt, and of course, cracked pepper. You will sprinkle the truffle oil on the pizza after it is cooked.

After the second rising period your dough should be ready for action.  First, sprinkle corn meal onto your peel (or baking sheet) so that the dough does not stick.  Pinch the sides of the dough ball into a crust and pull the dough (it should be nice and elastic-y) until it forms a nice rounded pie.  Place onto your peel and add the toppings.  I like to first brush the dough with a bit of olive oil first and lightly sprinkle some parmesean cheese.  I then coat the pizza with mushrooms and add taleggio on top.  At this point your oven should be piping hot so don’t forget to put your oven mitts on!  Slide the pizza onto the stone (it should slide off easily) or place your pizza on the baking sheet and into the oven.  Let it cook for only 10 minutes for crispy crust or 6-8 minutes for softer crust (I like mine crispy).  The last step is easy, just sprinkle truffle oil onto the pizza and a bit more of the parm…and marvel at your accomplishemnt…homemade restaurant style pizza that has a bit of artisan flair to it right in your very own home!