 New England fall invites you like an honored guest into its home and then just as quickly ushers you out. Each year I yearn for more of this fleeting season.
  Fall marks the beginning of school years and sports seasons, golden sunshine, brilliant foliage and of course a variety of seasonal fruits and vegetables. I could gush about many aspects of the fall harvest and the dishes they create; but for the purpose of today’s blog post, I’ll focus on the autumn apple and one of my favorite desserts, good old-fashioned apple pie.
  I’ve watched my Mom make dozens of apple pies over the years. When I was a child, she let me experiment with the dough. One home video in particular features young chef Kristen concocting what I labeled as “crisp apple pie” for Daddy to eat when he arrived home from work. Indeed, those pies were crisp – five year old hands don’t produce the flakiest of dough.
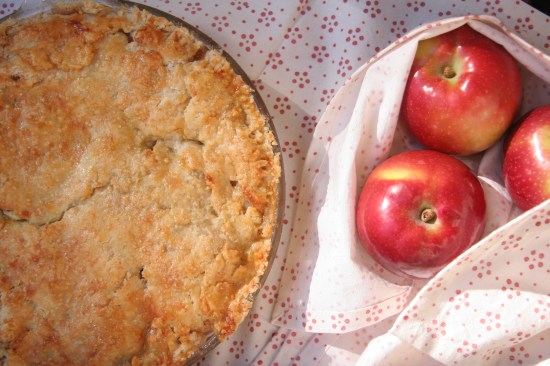
 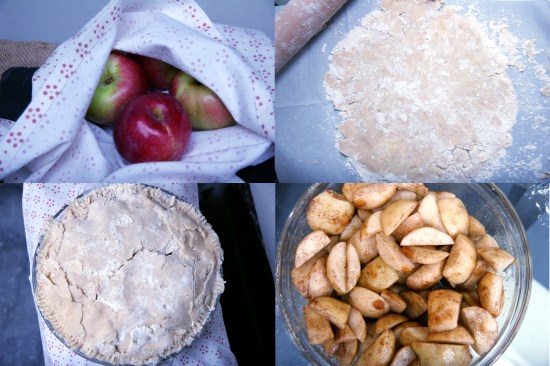 Fast-forward three decades and, again, I find myself sitting in my mother’s kitchen. This time I’m attentive, taking notes and asking questions. I figure it’s about time I properly learn the craft of pie-making. While my culinary skill-sets have matured, I still have quite the journey ahead of me. I can’t sugarcoat it, homemade pies are time-consuming, patience testing, and create an insane amount of dishes. But just like anything great, if it wasn’t hard everyone would do it. This timeless apple pie has a delicate, flaky crust, a gooey cinnamon and sugar coated center and leaves you feeling warm and ready for the colder months ahead. Hope you enjoy this classic apple pie recipe and the rest of your fall season!
 Ingredients:
- 2 cups flour
- 14 tbsps unsalted butter (or 12 tbsps crisco and 2 tbsps butter)
- 1 tsp salt
- 5 tbsps ice water
- 2 tsps lemon juice
- 10-12 medium mcintosh apples
- 1 cup sugar
- raw sugar to sprinkle on crust
- 1 egg (for egg wash)
- 1 tbsp cinnamon
- 1/8 tsp nutmeg
Directions:
Pastry: combine flour and salt, mix well. Cut cold straight-from-the-fridge butter (or butter/crisco combo) into small cubes and sprinkle into the flour/salt combination. Add ice water and lemon juice. Using a handheld pastry blender (or 2 butter knives) cut the butter into the flour until it resembles course, pea-sized crumbs. Press together with both hands to form a ball/disc. Don’t handle the dough too much. Cut roughly a 1/3 of the dough and reserve the remaining pastry for the top. Note: the 1/3 pastry will likely roll out to cover the bottom of the pie dish, but won’t line the sides of the dish. For a crust that also lines the sides of the pie dish increase the “pastry” ingredients above by half.
Filling: Peel apples, cut into quarters, then cut each quarter in half (avoid cutting the apples too small or the pie filling might become mushy while baking resembling apple sauce). Combine apples, sugar, cinnamon and nutmeg in large bowl. Mix well.
Pie assembly: Pre-heat your oven to 350°. Pat your surface, dough, and rolling pin with flour. Note — rolling dough out on parchment paper makes clean-up easier. Roll out 1/3 disc dough and transfer the rolled dough to the pie plate. There are some great tutorials online that make transferring the pie to the plate easy-peasy but don’t be discouraged if it isn’t as smooth as Gourmet Magazine makes it look! Pour the apple filling into the pie plate. Again, pat your surface, dough, and rolling pin with flour. Roll out the remaining dough to cover the top of the pie plate. Pinch edges with a fork or with fingers. Beat one egg lightly with a few tbsps water to make an egg wash. Brush the top of the pie with egg wash. Sprinkle raw sugar on top and cover the top of the pie plate with foil (this will prevent the crust from burning). Cook on 350° for 1 hour on bottom burner of oven. Increase oven heat to 400° and cook for 20 – 30 minutes longer. For last 5-10 minutes of cooking time remove foil for golden colored crust.